
 Home
Home
»
Carpool
»
Contact Info
»
Debrief
»
Fleet Info
»
Links
»
Logistics
»
Marks & Courses
»
Photos & Videos
»
Procedures
»
Results
»
Rules
»
Sitemap
»
|
Procedures
Sewer
The sewer is the area below deck. The primary responsibilities of the crew member who works in the sewer are to pack the spinnaker in the
turtle bag after the spinnaker is doused, and to operate the batteries, the engine kill switch, the running lights, and the radio.
If you're not familiar with some of the terms or concepts on this page, look them up in the Glossary and review
the Sailing Basics page.
Packing the Spinnaker
After the spinnaker is doused at the end of a downwind leg, it must be packed inside the turtle so that it is ready to use again on the next
downwind leg.
Packing the spinnaker is the process of putting the spinnaker inside the turtle. You can't simply stuff the spinnaker in the turtle, however
– you have to pack it carefully, so that it is oriented properly and does not have any twists in it. Packing the spinnaker in this manner
allows the deck crew to attach the spinnaker to the correct lines (spinnaker halyard, afterguys, and spinnaker sheets), so that it can be
hoisted quickly and cleanly (without any twists).
The edges of the spinnaker are colored, as shown in Figure 1. This helps crew members identify the different edges and corners of
the spinnaker when they pack it.

Figure 1: Colored Edges of the Spinnaker
Procedure for packing the spinnaker (“SPEED PACK”):
- Put the turtle between your legs, with the clips of the turtle at the 10:30 position. At this point you are packing the spinnaker as if
you were facing directly toward the bow of the boat.
- Find one of the clews.
- Look at the color of the sail edges at the clew to figure out whether you have the port clew or the starboard clew.
- The edges of the spinnaker have different colors:
- The port leech has a red edge.
- The starboard leech has a blue or green edge.
- The foot has a white edge.
- Thus, you can tell which corner you have by the color of the edges at that corner:
- The head has a red edge on one side and a blue or green edge on the other side.
- The port clew has a red edge on one side and a white edge on the other side.
- The starboard clew has a blue or green edge on one side and a white edge on the other side.
- Sit on the clew that you found:
- If you have the port clew, put it under your left butt cheek.
- If you have the starboard clew, put it under your right butt cheek.
- Position the clews in the same way that you will be draping them over the edge of the turtle.
- Now, stuff the foot of the spinnaker into the turtle. The foot goes in first because it is the last part to come out on the hoist.
- To stuff the foot, you "follow the foot" by sliding one hand along the edge, making sure there are no tangles, and then bring the part
that your hand just slid over down into the turtle.
- When you reach the clew at the other end of the foot, put that clew under your other butt cheek. You are now sitting on both clews.
- Now, pack the rest of the spinnaker into the turtle carefully so as to avoid getting any twists in it.
- If there are any twists in the spinnaker, the spinnaker will have an hourglass shape when it is hoisted, which will prevent it from
filling up and flying properly. Correcting a mistake like that takes a lot of time, hence the importance of packing the spinnaker withou
any twists.
- To prevent a twist, pack the spinnaker by following either the port leech (red) or the starboard leech (blue/green) until you get to
the head of the sail. If one leech doesn't have a twist, the other leech won't either.
- When following either the port or starboard leech, use the same technique of sliding-and-stuffing as with the foot, but after each few
armfulls of leech are stuffed, grab a few armfulls of the "fluff" coming out of the turtle and stuff that into the turtle as well. The
idea is that by the time you reach the head, you will have stuffed in the rest of the spinnaker as well.
- When you have finished putting the spinnaker inside the turtle, fold each of the corners of the spinnaker over the metal ring at the edge
of the turtle.
- The corners of the spinnaker should hang outside of the turtle so that the deck crew can attach the corners to the appropriate lines
without taking the spinnaker out of the turtle.
- "Corner" here means not just the small corner with the grommet, but a good-sized triangle you pretty much want the whole reinforced
sewn area around each grommet to hang outside the turtle.
- Close the lid of the turtle lid. Make sure that the bungee cord in the lid is secured over the metal ring at the edge of the turtle.
- Finally, double check your work:
- The head should be at the 12 o'clock position, assuming the turtle clips are at 10:30.
- The red edge of the head should be on the left, and the blue/green edge should be on the right.
- The port clew should be at the 8'clock position, with the red edge on the left and the white edge on the right.
- The starboard clew should be at the 4 o'clock position, with the blue/green edge on the right and the white on the left.
- The colors of the edges should be matched with each other. If you look at the turtle from above, starting at 12 o'clock, you should
see:
- blue/green edge at the head matched with blue/green edge at the starboard clew;
- white edge at the starboard clew matched with white edge at the port clew; and
- red edge at the port clew matched with red edge at the head.
Tips from Nancie:
- After packing the foot of the spinnaker, run up one side of the sail all the way to the top before packing anything else. The reason is
that when the spinnaker is very tangled (which happens sometimes), one of the corner grommets can be wound up in the sail, and it can be very
difficult to pull out of the sail. If you run up one side of the sail before packing the rest of the sail, you avoid this problem and could
potentially pack the spinnaker quicker and with less effort, at least when the spinnaker is very tangled after the douse.
- If you are not sure that all the spinnaker edges are straight, take the whole sail out of the turtle and start over again. It is really
critical to be able to hoist the spinnaker as quickly as possible and without any twists.
Batteries
Northern Light has two batteries – battery 1 and battery 2. The switch that turns the batteries on and off is located under the
stairs in the companionway. Go down the stairs into the cabin, turn around and face the stern, kneel down, and look for a black plastic dial
behind the stairs. See Figures 2 and 3 below.
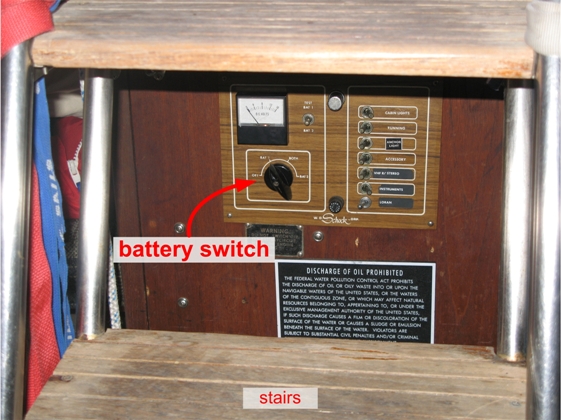
Figure 2: Electrical Control Panel
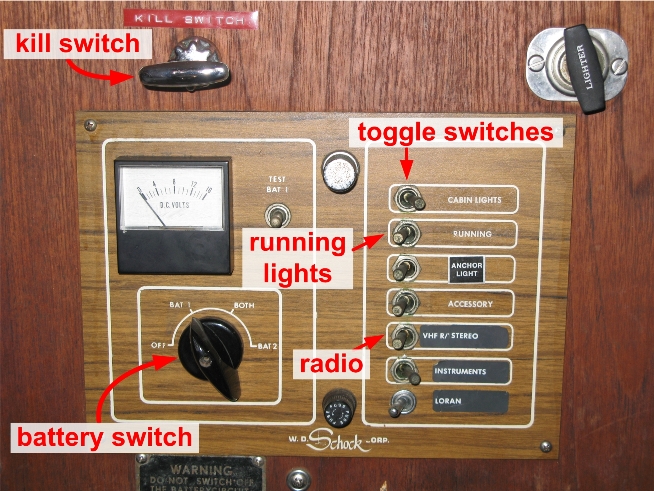
Figure 3: Closeup of Electrical Control Panel
To turn the batteries on or off:
- Locate the battery switch (see Figures 2 and 3 above).
- The battery switch is normally in the “OFF” position (turned all the way counter-clockwise).
- When Rod gives the command battery on: Turn the switch clockwise to th
position "BAT 1" or "BAT 2." We don't normally use both batteries at the same time, so don't turn the switch to
"BOTH" unless Rod specifically asks you to do so.
- When Rod gives the command battery off: Turn the switch all the way
counter-clockwise to the "OFF" position.
CRITICAL: NEVER TURN THE BATTERY OFF WHILE THE ENGINE IS RUNNING.
Engine
Rod controls Northern Light's engine from the helm, but the engine has a kill switch (choke valve) in the cabin that must be operated
by one of the crew members.
To operate the kill switch:
- Locate the kill switch.
- The switch is under the stairs in the companionway – go down the stairs into the cabin, turn around and face the stern, kneel
down, and look for a small chrome handle behind the stairs. The chrome handle is above the black battery control dial (see Figure 3
above).
- The kill switch is normally in the off position (pushed all the way in).
- When Rod gives the command kill switch on: Pull the kill switch all the way out
(toward you).
- When Rod gives the command kill switch off: Push the kill switch all the way in
(away from you).
Lights
All boats are required to turn on their running lights at sunset. Check the conditions section on the home
page to find out when sunset occurs on the day of the race.
To turn on the running lights:
- Turn on one of the batteries.
- Locate the running lights toggle switch.
- Look for the bank of toggle switches to the right of the black battery control dial. The switch for the running lights is the second
switch from the top; it is marked “RUNNING.”
- The running lights toggle switch is normally in the off (left) position.
- To turn on the running lights, move the switch to the right (on) position.
Radio
We may need to communicate with the Race Committee in certain circumstances (e.g., if the race is postponed, or if there's a recall after
the start of the race). Northern Light has two radios that we can use to communicate with the Race Committee and with other boats:
- a mounted radio (see Figures 4 and 5 below)
- a handheld radio (see Figure 6 below)
Instructions for how to use these two radios are provided below.
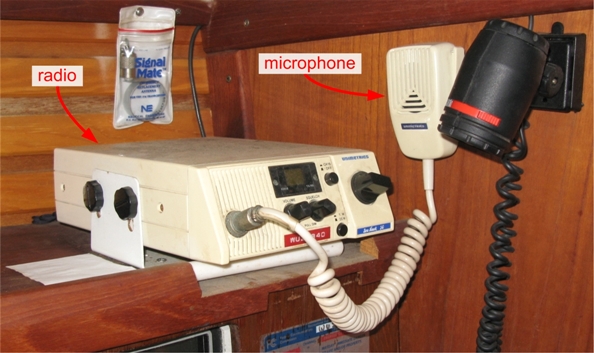
Figure 4: Mounted Radio

Figure 5: Closeup of Mounted Radio
To turn on the mounted radio:
- Go to the stairs under the companionway and turn on one of the batteries.
- Turn on the radio toggle switch (also under the stairs).
- Look for the bank of toggle switches to the right of the black battery control dial (see Figure 3 above).
- Find the switch marked “VHF R/STEREO,” and move the switch to the right (on) position.
- Locate the radio with the white housing mounted to the right of the chart table (see Figures 4 and 5 above).
- Turn the power/volume knob on the radio clockwise.
- TIP: Turn up the volume so that you and others can hear the Race Committee easily. Set the power/volume knob to about
75% of maximum.
- Turn the channel selector knob until the channel display shows channel 78.
- TIPS:
- Check the current Sailing Instructions to verify what channel the Race Committee uses. For 2012, the Race Committee uses
channel 78.
- Make sure the channel 16 toggle is set to OFF (pushed out).
- Adjust the following additional controls:
- Squelch: Turn the squelch knob counter-clockwise until you hear static on the radio, then turn the knob clockwise until the static
stops.
- Transmit power: Set the power selector switch to 1W (pushed in). In close quarters you should transmit at 1 watt instead of
25 watts.
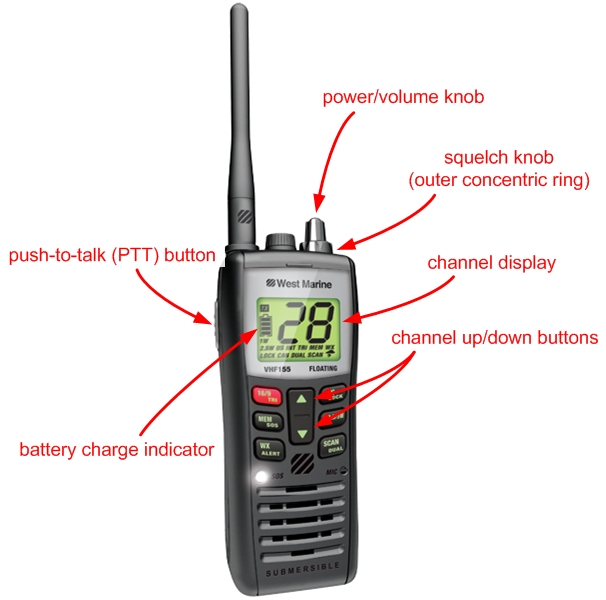
Figure 6: Handheld Radio
To turn on the handheld radio:
- Find the radio in the cubby space to the right of the chart table (under the Loran unit).
- Turn the power/volume knob clockwise.
- TIP: Turn up the volume so that you and others can hear the Race Committee easily. Set the power/volume knob to about
75% of maximum.
- Check the battery charge indicator on the LCD display to verify that the battery is charged.
- If the Li-Ion (rechargeable) battery is not charged, you can use AAA batteries instead:
- Open the battery latch on the bottom of the radio.
- Take out the Li-Ion battery.
- Locate the plastic baggie with the radio accessories (charging base, A/C adapter, manual, and the AAA battery case).
- Open the AAA battery case and put in four AAA batteries.
- Put the battery case in the radio and close the latch.
- After the race, put the Li-Ion battery back in the radio, and charge the battery by putting the radio in the
charging base.
- Push the channel up or down button until the channel display shows channel 78.
- TIP: Check the current Sailing Instructions to verify what channel the Race Committee uses. For 2012, the Race Committee uses
channel 78.
- Turn the squelch knob counter-clockwise until you hear static on the radio, then turn the knob clockwise until the static stops.
- Additional information:
- When using the radio on deck, make sure to use the wrist strap. We've lost a radio overboard before.
- The handheld radio is waterproof – you do not need to put it in a waterproof pouch.
- This particular radio floats – if it does fall overboard, locate it in the water immediately and keep pointing to it
while the driver turns the boat around.
To operate the radio:
- Mounted radio: Pick up and hold the microphone in your hand.
Handheld radio: Pick up and hold the radio in your hand.
- Locate the push-to-talk (PTT) button. You must push the PTT button every time you talk:
- A little bit before you start talking, push in and hold the PTT button.
- Keep the button pushed in while you are talking.
- A little bit after you stop talking, release the button.
- Wait until there is no traffic on the channel you wish to broadcast.
- Hail the party you want to reach:
- State the name of the party you're hailing two times, followed by “This is Northern Light, OVER.”
- Wait for the party you hailed to acknowledge you.
- If the party you hailed does not acknowledge you, hail them a second time, again stating their name two times.
- Wait for the party you hailed to acknowledge you.
- If the party you hailed does not acknowledge you, hail them a third time. This time state their name three times.
- If you don't get a response after three hails, wait some period of time before hailing again.
- Note: If you know that the party you are trying to reach is monitoring the radio, you can state their name only one time. For example,
if you hear the Race Committee talking with other people and you are waiting your turn to get in, you can simply say: “South Beach
Race Committee, this is the Northern Light, OVER.”
- When the party you hailed acknowledges you, proceed with your conversation. Here is a sample hail and conversation:
- NL: South Beach Race Committee, South Beach Race Committee, this is Northern Light, OVER.
- RC: Northern Light, this is South Beach Race Committee, OVER.
- NL: What boat was recalled in class
DeltaEchoGolf?, OVER.
- RC: The boat that was recalled in class
DeltaEchoGolf is sail number
6-7-6-3-02-8-3-1-26-7-6-3-0, OVER.
- NL: Say again, OVER.
- RC: The boat that was recalled in class DeltaEcho is sail number
6-7-6-3-02-8-3-1-26-7-6-3-0, OVER.
- NL: Thank you Race Committee. Northern Light OUT.
- When your conversation is over, sign off by saying either “OUT” or “STANDING BY.” In general you must end every
transmission with one of the following:
- OVER: means you are asking for a reply
- OUT: means you are not asking for a reply
- STANDING BY: means you will continue to monitor the radio
Using the radio in races:
- Before we leave the dock, locate and familiarize yourself with either the mounted radio in the cabin or the handheld radio.
Make sure that the batteries on the handheld radio are charged.
- Before the start of our race
(6:35 pm6:40 pm6:50 pm),
monitor channel 78 for any messages from the Race Committee (e.g., if there's a postponement).
- Note for 2012: The Race Committee will give the course over the radio 3 times only – at the class warning, at the class start,
and then after all classes have started (the Race Committee will call all courses one final time). If you call the Race Committee during
the starting sequence, you will not get a reply so please don't be surprised.
- Immediately after the start of our race, the Race Committee may put up an
individual recall flag to recall one or more boats. If this happens, get in touch with the
Race Committee and find out which boats have been recalled.
- After the start of our race, turn off the radio. If we're not using the racing computer, turn off the boat batteries as well.
- If we need to use the radio again during the race, turn on the radio and set it to channel 78.
Tips and additional information:
- Spell words using the military alphabet.
- Conversations should be as short as reasonable – get to the point and get off the radio.
- Before and during a race, monitor channel 78.
- Outside of the racing context, if the radio is on and you're not using it to communicate, you must leave it set to channel 16 (the
emergency/hailing frequency).
- Once you have contacted a party on a hailing frequency like channel 16, you must move the conversation to a “working
channel.” For example:
- NL: Please switch and listen channel 66, OVER.
- Response: Switching channel 66, OVER.
- Both parties then switch to channel 66 and continue their conversation.
- When you're done using the mounted radio, turn it off as follows:
- Turn the power/volume knob on the radio all the way counterclockwise.
- Turn off the radio toggle switch on the control panel under the stairs.
- Turn off the boat batteries. NOTE: NEVER TURN OFF THE BATTERIES WHILE THE ENGINE IS
RUNNING.
- When you're done using the handheld radio, you can simply turn the power/volume knob all the way counter-clockwise to turn
the radio off.
- If the rechargeable battery is low, plug in the charging base and leave the radio in the charging base after the race.
- The handheld radio model is West Marine VHF155; this is simply a West Marine-branded version of a Uniden MHS125. See the
MHS125 Owner's Manual (pdf) for additional information about how to use this radio.
To send a distress call in an emergency:
- Make sure the radio is on.
- Set the channel to channel 16:
- On the mounted radio, simply push in the channel 16 toggle button.
- On the handheld radio, simply push the red 16/9-tri button.
- Speak slowly – clearly – calmly.
- Press the push-to-talk (PTT) button and say:
MAYDAY, MAYDAY, MAYDAY.
THIS IS NORTHERN LIGHT.
MAYDAY, NORTHERN LIGHT.
- Describe the boat and the number of people on board.
- Give the position of the boat by latitude/longitude, or by bearing (true or magnetic, state which) and distance to a well-know landmark
such as a navigational aid or small island, or in any terms that will assist a responding station in locating the boat in distress. Include
any information on boat movement, such as course, speed, and destination.
- Provide the following information:
- the nature of the distress (sinking, fire, etc.)
- the kind of assistance needed
- the number of people on board
- any other information that might facilitate rescue, such as the length or tonnage of the boat, the number of people needing medical
attention, the color of the hull, etc.
- End your message by saying:
I WILL BE LISTENING ON CHANNEL 16.
THIS IS NORTHERN LIGHT, OVER.
- Release the push-to-talk (PTT) button and listen for a response.
- If you do not get an answer after 30 seconds, repeat your call, beginning at step 4 above.
- Here is a sample distress call:
- MAYDAY, MAYDAY, MAYDAY.
- This is Northern Light.
- MAYDAY, this is Northern Light.
- We are a 35-foot sailboat with eleven people on board.
- We are located near Cape Henry Light, bearing south 185 degrees magnetic, distance 2 miles.
- We have struck a submerged object.
- We need pumps, medical assistance, and tow.
- There are nine adults and two children on board.
- One person has a broken arm.
- We estimate we can remain afloat two hours.
- Northern Light is a 35-foot sailboat with a blue hull, sail number 1-8-6-1-9.
- I will be listening on channel 16.
- This is Northern Light, OVER.
- Stay by the radio if possible. Even after the message has been received, the Coast Guard can find you more quickly if you can transmit a
signal on which a rescue boat or aircraft can home in.
For additional information on using marine radios, see
http://www.boatsafe.com/nauticalknowhow/radio.htm.
|