
 Home
Home
»
Carpool
»
Contact Info
»
Debrief
»
Fleet Info
»
Links
»
Logistics
»
Marks & Courses
»
Photos & Videos
»
Procedures
»
Results
»
Rules
»
Sitemap
»
|
Procedures
Navigator
The primary responsibilities of the navigator are to:
- help Rod steer the boat to the marks on the race course, and
- help Rod measure the effectiveness of the crew's adjustments by telling him whether the boat speed increases or decreases after the adjustments.
The navigator uses a GPS unit to carry out these duties.
If you're not familiar with some of the terms or concepts on this page, look them up in the Glossary and review the Sailing Basics page.
Before the Race
- Familiarize yourself with the marks (buoys) in the race area, including their names and relative locations.
- The Marks & Courses page shows the marks and courses we use in our races. For the 2011 season, there are a total of 8 marks in the race area, and 35 courses around those marks. The race committee tells us which course to use 5 minutes before the start of our race. For example, the race committee may tell us to use "course 17" for our race on a particular day. In this case, we look up course 17, and see that we need to sail around the following marks: SC1 → AS1 → NAS2 → SC1 → 34 → SC1 → Finish. Your job as the navigator is to tell Rod how to steer the boat to get to each of these marks in sequence.
- The start-of-race cheat sheet (a small laminated card) also lists the marks and courses. In addition, the cheat sheet lists the magnetic compass bearings between the marks:

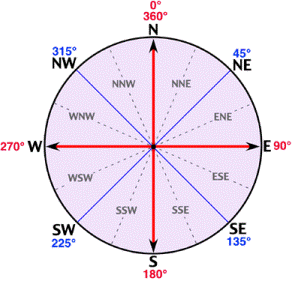
- Each crimson-colored number on the cheat sheet is the bearing from the mark on the left of the crimson number to the mark on the right of the crimson number. For example, in course # 1, the bearing to get from AS1 to SC1 is 58°. Bearings are measured in degrees, with North being 0°, going clockwise:
- Familiarize yourself with the GPS units:
- There are two GPS units on Northern Light: a Garmin GPS 12XL (the smaller, older unit), and a Garmin GPSmap 76 (the larger, newer unit; "GPS 76" for short). The two GPS units are shown below:
| GPS 12XL |
GPS 76 |
 |
 |
- Skim through the owners manuals:
- Read the rest of this page to learn:
- how to tell the GPS units to navigate to a waypoint (in GPS parlance, a "mark" is called a "waypoint" – both terms refer to a fixed location, like the location of a buoy, to which we are trying to navigate)
- how to call up the highway page that shows you the data we care about
- how to interpret the data fields displayed on the highway page
At the Dock
- Locate one of the two GPS units. The GPS units are usually stored in the cabin, to the right of the chart table.
- Turn on your GPS unit and make sure its batteries are charged.
- Turn on the GPS unit outside, since it will try to acquire GPS satellite signals as soon as you turn it on. Point the top of the unit toward the sky to help it locate the GPS satellites more quickly (the antenna is located in the top of the unit).
- The GPS units are stored in soft plastic waterproof cases in order to protect them. You have to push the buttons hard in order to activate them through the case.
- To turn the GPS on/off, press and hold the red power button.
- After you turn the GPS on, you may need to press the ENTER button once or twice to get past the legal disclaimers.
- For the GPS 12XL: When you turn on the unit, it will display a "satellite" page that shows the satellites from which it is acquiring signals. On the left side of the satellite page there is a bar graph that shows the battery strength (E to F). If the battery strength is low, put in 4 new AA batteries. The battery compartment is located at the base (bottom) of the unit.
- For the GPS 76: Press the MENU button one or two times to pull up the main menu. The battery strength indicator is displayed in the lower right corner on the main menu page. If you need to replace the batteries, put in 2 new AA batteries. The battery compartment is located on the back of the unit.
- Batteries are stored in a small tupperware container in the compartment below the chart table.
- If you dont have one already, get a "start of race cheat sheet" – a small laminated card that lists all the courses. Extra cheat sheets are stored in the chart table.
At the Start of the Race
Look at the race committee boat (or listen to the other crew members) to figure out what course we are using for our race. Look up the course on your cheat sheet to see what marks we need to navigate to.
Advanced Procedures
Once you're comfortable working with the GPS units, you can help Rod time our approach to the start line. In order to do this, you need to have both ends of the start line entered as waypoints in your GPS unit. The ends of the start line are the SC1 buoy, and the orange flag on the race committee boat. (You can see photos of the SC1 buoy and the race committee boat on the Marks & Courses page.) The mark SC1 is already entered as a waypoint in the GPS units, but the race committee boat is not, because it anchors in a different location for every race. To enter the race committee boat as a waypoint, you need to manually add a waypoint for the race committee boat when we sail next to it.
To enter a new waypoint for the race committee boat, wait until we are as close as possible to the orange flag on the race committee boat, and then follow the steps below. If you're not sure exactly where to mark the waypoint, err on the safe side – mark the waypoint when you're sure the entire boat is on the pre-start side of the line.
- GPS 12XL:
- Press the MARK button.
- The Mark Position page appears, showing the captured position and a default three-digit name (e.g., "012"). Remember the name of this waypoint.
- Write down the latitude/longitude coordinates of this waypoint, and give them to Andy after the race.
- Press the ENTER button to confirm the "SAVE?" prompt.
- GPS 76:
- Press and hold the ENTER/MARK button until the Mark Waypoint page is displayed.
- The Mark Waypoint page shows the captured position and a default three-digit name (e.g., "012"). Remember the name of this waypoint.
- Write down the latitude/longitude coordinates of this waypoint, and give them to Andy after the race.
- Highlight "OK" on the screen and press the ENTER button on the GPS unit to save the waypoint.
Once you've entered the race committee boat as a waypoint:
- Ask Rod which end of the steering line we are aiming for: SC1 or the race committee boat.
- Tell the GPS unit to navigate to SC1 or the race committee boat (e.g., waypoint "SC1" or "012"). See the section below, "How to tell the GPS unit to navigate to the next mark (waypoint)".
- Call up the highway page on your GPS unit and read the DST (distance) and ETE (estimated time en route) fields to Rod. These fields tell us how close we are to the start line in terms of distance and time, which helps Rod get us as close as possible to the start line without going over early. Read out the DST and ETE fields frequently, especially as we get closer and closer to the start line.
- Compare the ETE with how much time is left before the start of the race, and advise Rod on when to turn the boat and start heading toward the start line.
- Assume that it takes us 30 seconds to do the final tack or jibe, and that we want to get back to the start line with 10 seconds of leeway. In short, add 40 seconds to the GPS ETE reading, and tell Rod to turn back toward the start line when that number matches the time left to the start signal.
- Ideally you should also give Rod a 1-minute warning before it's time to turn back toward the start line.
- The table below shows an example of what to tell Rod, and when to tell him. The example assumes that the start signal is at 6:40pm. Delta (Δ) is the difference between the time-to-start-signal and the ETE.
| boat action |
time of day |
time to
start signal |
ETE |
Δ |
what to tell Rod |
| sailing away from start line |
6:36:20 |
3:40 |
1:00 |
2:40 |
Rod, you should turn the boat around in 1 minute. |
| start of turn toward start line |
6:37:20 |
2:40 |
2:00 |
0:40 |
Rod, you should turn the boat around now. |
| end of turn toward start line |
6:37:50 |
2:10 |
2:00 |
0:10 |
– |
| sailing toward start line |
6:38:00 |
2:00 |
1:50 |
0:10 |
– |
- As we head back to the start line, Δ should be 10 seconds. For example, when the time-to-start-signal is 1:00, the ETE should be 0:50.
- If Δ > 10 seconds, tell Rod we need to kill some time. For example, if the time-to-start-signal is 1:00, the ETE is 0:40, and Δ = 20 seconds, tell Rod “Rod, we're going to get to the start line 20 seconds early, we should kill some time.”
- If Δ < 0, tell Rod that we will be late to the start line, and that we should go full speed. For example, if the time-to-start-signal is 1:00, the ETE is 1:10, and Δ = -10 seconds, tell Rod “Rod, we're going to get to the start line 10 seconds late, we should go full speed.”
After the race, tell Andy the waypoint number of the race committee boat (e.g., waypoint # 012).
To keep the list of waypoints in the GPS unit short and clutter-free, you may want to delete some old waypoints:
- GPS 12XL:
- Press the PAGE button until you get to the Menu page.
- Highlight "WAYPOINT LIST" and press the ENTER button.
- Use the arrow keys to select the waypoint you want to delete (e.g., "008") and press the ENTER button.
- Highlight "DELETE?" and press the ENTER button.
- Highlight the "YES?" prompt and press the ENTER button.
- GPS 76:
- Press the MENU button twice to display the Main Menu.
- Highlight "Points" and press the ENTER button.
- Highlight "Waypoints" and press the ENTER button.
- Select the desired waypoint from the list (e.g., "008") and press the ENTER button to display the Waypoint page.
- Highlight "Delete" on the screen and press the ENTER button.
- Confirm that you want to delete the waypoint.
Under Way
Once we're under way, follow this basic sequence of steps:
- Tell the GPS unit to navigate to the next mark (waypoint) on our course.
- Call up the highway page on the GPS unit.
- Read the data fields on the highway page, and call out the data to Rod.
When we reach a mark, tell the GPS unit to navigate to the next mark after that, and repeat the steps above until we reach the finish line. The steps are described in detail below.
How to tell the GPS unit to navigate to the next mark (waypoint):
- GPS 12XL:
- Press the GOTO button.
- Use the arrow keys to select the next waypoint on our course, and press the ENTER button.
- GPS 76:
- Press the NAV button.
- Tip: Give the NAV button just a quick press. If you hold the NAV button down too long, the GPS unit will record a MOB (Man Overboard) waypoint.
- Select Go To Point and press the ENTER button.
- Select Waypoints and press the ENTER button.
- Press the ENTER button to change focus from the one-line text field at the top of the screen to the square-shaped field with the list of waypoints.
- Use the arrow keys to select the next waypoint on our course, and press the ENTER button.
- With "Goto" highlighted, press the ENTER button.
How to call up the highway page on the GPS unit:
- GPS 12XL:
- Make sure you've told the GPS unit to navigate to a waypoint.
- Press the PAGE button until you get to a navigation page.
- The GPS 12XL has two navigation pages: a compass page and a highway page.
- If you see the highway page, you're done.
- If you see the compass page, press the ENTER button, select Highway, and press the ENTER button again.
- GPS 76:
- Make sure you've told the GPS unit to navigate to a waypoint.
- Press the PAGE button until you see the highway page.
How to interpret the data on the highway page:
- The highway page will look like one of the screenshots below. (We've configured the GPS units to show some different data fields, so the highway page will not look exactly like these screenshots.)
| GPS 12XL |
GPS 76 |
 |
 |
- For the GPS 76, the highway page has been configured to show the following data fields:
- Highway Graphic
- The highway graphic represents a road from the vantage point as if you were driving a car. If the road points straight up the screen, the waypoint is directly ahead. If the top of the highway points to the left, the waypoint is to the left. If the top of the highway points to the right, the waypoint is to the right.
- Tell Rod whether the waypoint is way left, way right, dead ahead, or somewhere in between based on which way the road is pointing. Use positions on the clock to make it clear where the waypoint is. For example, if the waypoint is dead ahead, tell Rod the waypoint is at 12:00 o'clock; if the waypoint is slightly to the right, tell Rod the waypoint is at 12:30; if the waypoint is way to the right, tell Rod the waypoint is at 2:00 (or whatever number is appropriate).
- If you find the highway graphic confusing, you can tell Rod the direction of the next waypoint by reading the TRN data field instead. The TRN field tells you whether the wayoint is left or right, and by how many degrees (see the description of the TRN field below).
- BRG (Bearing)
- BRG is the compass direction from our current location to the next waypoint.
- Bearings are measured in degrees, with North being 0°, going clockwise (see the figure in the Before the Race section).
- DST (Distance)
- DST is the distance to the next waypoint.
- TRN (Turn)
- TRN is the angle to the next waypoint.
- A reading of 0° means we are on course (i.e., the next waypoint is dead ahead). A reading of L 5° or R 5° means the next waypoint is 5° to the left or 5° to the right.
- Tip: Read the TRN field and report it to Rod exactly as the field is displayed on the GPS, i.e. in degrees left or degrees right. Do not try to convert the angle to clock positions, or the left/right direction to port/starboard – it's too easy to make a mistake. Simply read the TRN field directly from the GPS.
- TRN is helpful not just for figuring out whether we need to steer left or right to get to the next waypoint, but also for figuring out when to tack. Our tack angle is ~ 80°, which means that when we sail to the windward mark and we change from port tack to starboard tack (or vice versa), our boat turns through 80°. We lose speed every time we tack, so generally we want to minimize the number of times we tack. We can minimize the number of times we tack by waiting to tack until the GPS tells us the next mark is 80° or more from our current heading. So if the TRN indicator tells us we need to turn 75°, we should hold off on tacking, or well need to tack several more times before we get to the mark. But if the TRN indicator tells us we need to turn 80° or more, we can go ahead and tack – our boat will turn 80°, and we should be able to make it to the mark without any further tacks.
- Similarly, TRN is helpful for figuring out when to jibe. Our jibe angle is ~ 60°, which means that we turn through 60° when
we jibe. So if we're heading downwind and the TRN indicator is greater than 60°, we should jibe.
- SPD (Speed)
- SPD is our speed over ground – i.e., how fast our boat is travelling.
- ETE (Estimated Time Enroute)
- ETE is the amount of time until we reach the next waypoint.
- VMG (Velocity Made Good)
- VMG tells us our speed toward the next waypoint (i.e., our speed in the direction of the next waypoint).
- Think of VMG as the speed with which we are closing in on the next waypoint. For example, if our speed over ground is 5 knots but we are moving away from the waypoint, our VMG is -5 knots.
- We use VMG to measure the effectiveness of the adjustments the crew make on the boat: If the crew makes an adjustment (e.g., changing the trim of the sails, or shifting their weight to a different part of the boat) and the VMG increases, the adjustment is a good one.
Putting It All Together: What Rod Really Wants to Know
Going Downwind
- Immediately after rounding the weather mark (AS1, SB1, or sometimes SC1), Rod wants to know the compass bearing to the next mark. See the Before the Race section at the top of this page for an explanation of how to read the bearing to the next mark on the start-of-race cheat sheet.
- As soon as possible after you tell Rod the bearing, he would like to get the turn angle or GPS highway/arrow information to the next mark. That information measures our track over ground and the shortest distance to the mark. See the sections above titled "How to tell the GPS unit to navigate to the next mark", "How to call up the highway page on the GPS unit", and "How to interpret the data on the highway page".
- As soon as anyone spots the mark we are heading to, tell Rod so he can get a visual of the mark. This helps him make the steering more precise.
Going Upwind
- After rounding the leeward mark, call up the next mark on the GPS and start looking at the TRN field (the angle we have to turn to get to the next mark). The TRN angle gives us a starting point for determining the layline to the mark.
Everywhere on the Course
- As we head toward a mark, the turn angle (TRN) is generally the most important data to call out, since that tells the driver how to steer the boat toward the mark.
- In addition to the turn angle, it's also good to call out the time/distance to the next mark; this helps the crew gauge whether they have spotted the correct mark.
- Monitor the VMG closely – it's always good to know what our existing VMG is before we make any change, so that we can compare it with the new VMG after we make the change. This tells us if we are going faster or slower after the change.
Tips
- It can be hard for Rod to hear you – he's all the way at the stern end of the boat, and there are usually several people talking to him. When you read data from the GPS unit to Rod, please turn to face him, and speak LOUDLY.
- Don't call out bare numbers. There are usually several people calling out data to Rod, so tell Rod exactly what data you're providing, e.g.: “ETE is 2 minutes” or “VMG is 5.5”.
- Try to be proactive in providing data to Rod. Every couple of minutes or so, look at the GPS unit and tell Rod something like, "The mark is at 11:35; VMG is 5.5." If Rod has to ask you for the GPS data repeatedly, you're not reading it to him frequently enough.
- When we get close to a mark, put in the next mark/waypoint on the course (i.e., tell the unit to navigate to the next mark) before we reach the first mark. By the time we round the first mark, the GPS unit should already be navigating to the next mark, so that you can tell Rod the direction to the next mark (TRN or BRG) immediately after we round the first mark.
- If the GPS unit starts to beep, press the PAGE button until you get to the page with messages.
- Most likely the GPS is low on batteries, or losing the satellite signals because you've tucked the unit in your pocket or somewhere else where the reception is poor.
- To turn the GPS off, press and hold the red power button. If you press but do not hold the power button, the GPS will enter the backlight adjust mode. Press and hold the power button until the GPS is off to make sure you don't discharge the batteries.
- Distances are in nautical miles. One nautical mile = 1.15 statute (land) miles.
- Speed is in knots. One knot is one nautical mile per hour, or 1.15 mph.
- The GPS units have been programmed with the 2011 SBYC race courses (all 35 of them).
- In GPS parlance, a course is called a "route." Each route is simply a sequence of waypoints.
- In theory, it would be nice to use the GPS to navigate the route that corresponds to the chosen race course, rather than navigating individually to each waypoint on the route. The problem with the "navigate route" function is that the GPS unit assumes you want to get to the finish line as quickly as possible, and skips the waypoints that it thinks are not necessary. For example, if a course requires us to sail around mark SC1 twice before heading to the finish line, the GPS unit assumes that as soon as we're near SC1 the first time, we want to head straight for the finish line, so it skips all the remaining legs in the route except for the last leg to the finish line. The bottom line is to be careful when navigating routes. The more reliable course of action is to navigate to individual waypoints.
- If you need to re-enter waypoint data into one of the GPS units, or if you want to program a different GPS unit, the Marks & Courses page has:
- the latitude/longitude positions of the waypoints
- the route information
- The easiest way to enter or edit waypoint and route data is through a gpx file ("gpx" stands for "GPS exchange format"). You can use a free program called EasyGPS to edit the 2011 gpx file with waypoints and routes, and then upload the entire file to a GPS unit.
- If you entered a new waypoint to mark the race committee boat at the beginning of a race, write down the latitude/longitude coordinates of that waypoint and give them to Andy (he uses that info to draw the start line in Google Maps and Google Earth).
|